Help for your tight calf muscles & tips to relieve your back pain.
Sherwin Nicholson | Updated July 1, 2025
Stretching your calves is key to relieving back pain
If your calves are tight, short or weak, you can be in for some joint discomfort, especially back pain which is a chronic problem you don’t want to ever have.
Not only will having tight calves affect your back but it will change the way in which you stand and walk.
Most people don’t know that tight calves can cause them back problems until you are evaluated by a physical therapist or sports trainer.
Look out for problems in your daily routine
Are you constantly tiring or activating your calves all day long and not stretching them sufficiently? If so, then this is what will cause them to progressively become shorter.
Working at home or in the office has had a huge impact on our health. It causes problem with how we are to adjust to being at home for many hours. We have either had to give up major sports, access to fitness centers and even the time to feel mentally well enough to stay fit. If you can take the time to explore this site to keep yourself in shape, it’ll be time well spent.
If you’re a runner, walker, cyclist, someone who spends all day standing then I bet your calves are a big problem for you. You may even have issues with cramps or back pain. High heels are also a culprit which can cause more problems for the body.
Follow this quick test for short calves now
If there was a very quick way that you could test yourself right now for tight calves, would you try it? Well here it is.
It’s called the Deep Squat Rest
This is a very simple yet surprisingly challenging move for some people who may have tight and inflexible joints. For overall joint flexibility this test is quite revealing.
If you’re generally fit and don’t consider yourself to have any real issues with your hips, knees and back, then it should take no more than a few seconds to get into a full/deep squat.
You should also be able to raise and lower yourself relatively easy without even using your hands. I consider this seated position to be a golden standard for evaluation your overall lower body’s level of fitness.
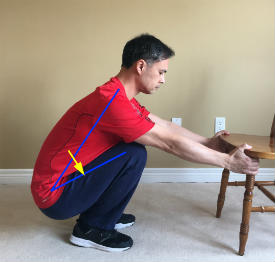
If you need to hold on the chair, your calves are too tight!
So if you suspect that tight calf muscles are your issue, then do the following:
- Stand straight up with your feet either close together or shoulder width apart
- Position your feet pointed straight forward or slightly outwards as either way is fine
- Without using your arms for support, lower yourself as though you were squatting onto a chair
- Lower yourself slowly for better control or stability
- Contract your hips so you can bring your abdominals into your thighs
- Try to remain balanced and go as low as possible while keeping your feet FLAT on the floor
As you go lower, there may be many things that may affect how well you will be able to descend. If your back is stiff, hips are tight or knees are sore this will affect you.
This Squat Rest is able to reveal most of the areas of YOUR body from head to toe that are becoming either too tight or too stiff. This simple movement is a very reliable way to test for lumbar issues and stiffness.
To learn more about the Deep Squat and how to best use it for relief.
How is your balance as you try to squat?
As you lower yourself into the squat, you will find that your ability to remain upright (without falling backwards) may be your problem.
If you are falling backwards, then you may have very tight calves.
Most people should be able to squat deeply with their feet planted fully on the floor.
It’s having tight or short calves that is throwing you off balance and backwards.
Perhaps your calves are also slow to release as you lower and by squatting at a slower rate, you may be able to keep from falling back.
Ideally you should be able to lower yourself so that your abs are fully resting against your thighs and there should still be some flexibility in your calves to lean yourself forward or backwards as by tilting on your ankle.
Solutions if you are falling backwards
The First Stretch
If you are, then here are some simple ways to begin stretching your calf muscles. There are many ways to do it.
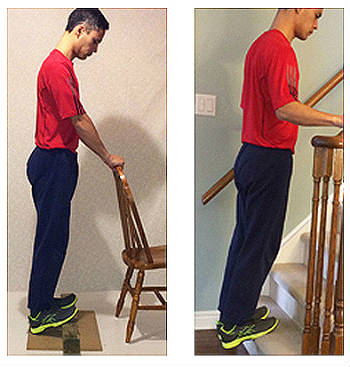
The most effective one in my opinion is to stand on the steps with one leg and to simply relax your calf muscles as far as possible. This method is simple but will take patience.
It should help you to achieve the most effective stretch possible and in as little time needed.
I recommend that you first perform this stretch by standing on either a set of books, a 2X4 strip of wood or any support that is elevated securely 1-2 inches off of the ground.
This should give you an initial way to stretch easily and comfortably.
As you progress, you’ll will need to fully allow your heels to hang as low as possible.
The easiest way to stretch tight calf muslces
To do this, stand with your feet on a step of a stairs. Allow both heels to hang while only using your body weight. You’ll find it easier to wear shoes for both comfort and grip. This way, you can stay in this position for a longer time.
To achieve to most stretch possible, simple move to stretching on one leg at a time. This will double your intensity.
What is the ideal amount of time to stretch for?
To be honest, for as long as possible. But in reality, you should stretch for 1-2 minutes non-stop and several times per day throughout the day. This should come out to about 10-15 minutes per day.
Since calf stretching can’t really be combined with any other activity to save time, you’ll need to make the time to do it during any of your leisure moments such as while watching screens.
Calf muscles can be stretched every day especially if you are the type of person to exercising them every day. If they become sore after an intensive stretch, then it is much better for you to rest for a few days before resuming.
Within a few months, your calves should be quite well stretched and your ability to perform the Deep Squat Rest should be a lot better.
Don’t be alarmed or discouraged by the amount of time you are spending at first lengthening your muscles. As you improve, you will need to commit less time for each exercise. It will then become more convenient to add a few more exercises without adding too much time.
Sadly, because we stand, sit or walk all of the time, our calf muscles are either active or resting in a shortened position. Because of this, you should actively find the time to lengthen them as often as possible.
To get them to remain at their optimal length, you need to have your toes raised above horizontal. So when you are standing straight up, just raise your toes up off of the ground and hold them up. This will be hard if you have short calves.
The Second Stretch
The next way to stretch them is to stand next to any upright support such as a post or wall and to simply touch your toes just above the base, rest your heel on the floor and then straighten your leg and hold. Be careful not to strain your knee when you do this.
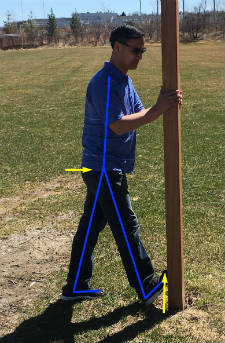
Progress to stretching your calf intensively
You can even increase the difficulty by bringing your body closer to the post. Hold for the above stated amount of time also.
Both of these stretches are considered fairly efficient ways that you can lengthen these stubborn muscles as they are known for requiring a lot more time to lengthen when compared to all of the other muscle groups.
This is why many people can Deep Squat quite low but still feel that they are going to fall backwards.
By just stretching out the Gastrocnemius and Soleus your Squat will be maximized and your joint and back pain will become much more manageable if not better relieved.
There are even more stretches that can help you
Even though you have just done the 2 most important stretches for relief, I would like to encourage you to also add these next ones to your stretching routine. They will also add to your ability to create a greater range of motion and will help to involve the other joints that can be likely compromised as well.
The Third Exercise
This third exercise/stretch is fairly straight forward as an excellent means to stretch your calves.
But what you’ll notice is how much is involved to be able to do this.
This compound motion will involve your hip flexors, knees, hamstrings and many muscles necessary first in order for you to begin to stretch your calves.
If you find this initial movement difficult, then you are already experiencing some of the problems with these areas of your lower body that will affect your back. This should be taken seriously and there are many suggestions on this site that can help you with this problem.
Provided that your legs are reasonably flexible, you should find this movement quite helpful for your tight calf muscles and it will give quite the stretch that you’ll need to help lengthen them dynamically.
Bring your thigh close to you while pulling your toes back as much as possible
Extend your leg straight forward or upward
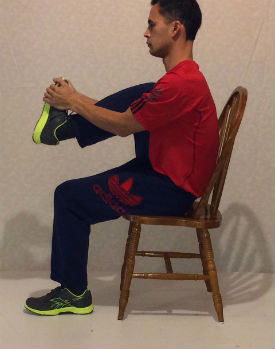
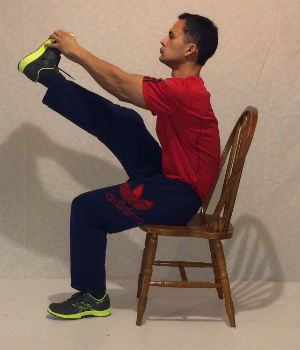
To Begin the Seated Calf Stretch
- Sit comfortably on a chair and avoid using the backrest
- Sit up straight and lean forward slightly
- Raise one foot up to your body and grasp at the TOP of your feet with both hands
- Pull your foot close to your body and keep it suspended
- Contract your ankle to bring your toes up towards you (to stretch your calf)
- Slowly extend it forwards while holding your foot with both hands
- Hold and pause for a few seconds
- Bring your foot back in towards you
- Rest your foot on the ground a repeat with the other leg
If your calves are SUPER tight, then you would either be able to:
- extend your leg well but will only point your toes further away from you
- keep your toes contracted towards you and only extend your leg a short distance
- extend your leg and keep your toes contracted with some mild to moderate strain in the calf
You should be aiming for at least a 3/4 extension while keeping your calves reasonably stretched at the same time.
This image above shows me performing the last point. There is a reasonable amount of extension and some moderate amount of toe/foot contraction up towards me.
Involving the whole leg and hip
As you get better with this movement, you should aim to extend your leg at higher angles. The higher in the air the better. You can also perform this same movement while seated on the floor.
Remember: You don’t need to be a yoga master at achieving a FULL stretch.
Most people have calves that at too tight, so lengthening them to a reasonable amount is quite easy. Time is the only concern because the muscles are known to take a very long time to lengthen. Patience is your best asset and you will prevail as long as you persist.
The Fourth Stretch
This last stretch involves both active stretching both the calf and hamstring muscle groups. It is not as comfortable but will help your gains dramatically. It is very straightforward to do and requires a fair amount of hip flexor strength.
This movement help you to isolate your gastrocnemius and soleus muscle at the beginning. By doing this, the movement will become more effective for you.
Hold on the wall or a support and lift your toes upward
Raise your leg as close to horizontal while keeping your toes pulled towards you
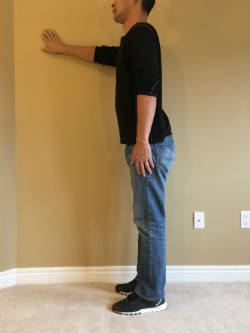
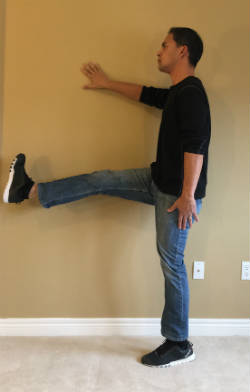
Standing Leg Raise
To begin the Leg Raise:
- Stand straight up while holding on to the wall for support and balance
- Contract one foot by raising your toes up towards you as high as possible
- Hold your toes in this contracted position
- Slowly raise the same leg up towards horizontal WITHOUT bending your knee
- Hold at your highest position WITHOUT relaxing your foot
- Hold for a few seconds at a time and then lower
- Repeat for the other leg
It’s important to keep your calf fully stretched as you raise. This gives you the best movement possible.
The Leg Raise should cause you experience quite an intensive stretch for the upper portion of your gastrocnemius muscle. If you can raise to almost horizontal, you’re well on your way to releasing your tightness. Don’t worry about how long it will take but how well you can do it.
Keep these 4 Stretches for your Tight/Short Calves a regular part of your routine
Four separate method may be quite time consuming for you at first. So here are some suggestions to help you manage the routine without becoming fatigued.
- Practice the 1st stretch (Standing Stretch) first and without perform the others for a few days (10-15 minutes total per leg).
- Add the 2nd stretch (Post/wall stretch) after a few days and only when you have experienced some lengthening from the 1st stretch (10-20 minutes total per leg, 5-10 minutes per exercise).
- After practicing the 1st and 2nd for 1-2 weeks, add in the 3rd and 4th (5 minutes per exercise).
This will make for a very dynamic and active stretch routine.
It will take 1-2 months depending on how well you are training but in the long run your calves will definitely NOT be as tight as they were before started.
Test yourself with the Deep Squat Rest to help to re-evaluate your stability and overall lower body flexibility. Your lower back should experience much less discomfort as your progress.
Get even more help for your calves and lower back now!
Have you found the above information helpful? If so please continue to search this site for even more support for your back and joint issues now.
My site is all about give you the encouragement and goal of relieving your joint discomfort. There are over 120 pages of content to help you overcome any lower back, hip, and knee pain.
If your tight calves are a problem, then you most likely have some nagging back issues too.
If you liked this article, then you’ll love:
Try these 10 exercises for relief.
Are your hamstrings also tight? Get help here.