This Seated Hamstring Stretch Will Solve Your Tight Hamstring Problems
By Sherwin Nicholson | May 4, 2020
Learn a safer, better, stretch that won’t injure your back
That’s right. Most hamstring stretches do a lot more harm than good. Not to your hams, but to your discs.
Here is the BETTER alternative.
Tight hamstrings happen in virtually all cases of chronic lower back pain. The constant pull of these tight muscles forces the lumbar spine into a forward bent posture, this is BIG problem during physical activity. Sadly, overall mobility of the hip joints becomes worse.
What’s even more of a problem, is that as you sit down (which I bet you are doing right now), you’re deactivating them. This makes them even less responsive when you try to use them.
When you stand up now, you’ll have your pelvis tilting backwards. That’s really bad for you, no thanks to your hamstrings.
What does proper hip mobility look like? Simply put, it’s when your hips should act as the joint where all movement occurs, rather than at any level of your spine.
These tight and short muscles are a very common problem to have because of our ‘sit on our butt all day and avoid physical activity culture’. This very poor habit is among many that wears out our soft tissue and hurts. Consequently, we should all understand what we are doing to our discs and the value of SAFE stretching.
Please Scroll Down to begin the Safer Stretch. However, I really encourage you (beg) to sit for a bit longer (ironic) to see my perspective.
Standard Hamstring Stretches Don’t Work and Are In Fact Very Risky
The problem is that the most common techniques (such as leaning over to touch your toes) which are commonly encouraged for tight hams are detrimental and very risky when considering the integrity of the lumbar discs (especially the most well abused L5-S1). In fact, they may worsen any injury you have now. Such methods encourage you to bend your back to facilitate the stretch which can lead to lumbar disc injury and pain.
Personally, I cringe when my daughter’s soccer coach tells her to ‘lean over to touch your toes’. I then quietly inform her to do it the right way and fake any strain when she has to do it their way.
There are so many possible techniques to relax tight hamstrings. These exercises can effectively correct the lack of flexibility and mobility within your pelvis. It is important to select and follow a program that is protective of your discs whenever you stretch.
The following technique is an excellent alternative that minimizes lumbar stress and lower back pain.
The Seated Hamstring Stretch below is a great exercise to help you have relief. It is Exercise #9 of the Progressive Exercises (See The Program Table of Contents) which helps to reduce pain by:
- Encouraging you to preserve a safe posture (reduce lumbar disc injury).
- Maintaining both neutral lumbar and pelvic tilt posture (reduce spinal imbalance).
- Lengthens your hams safely, effectively and with greater control (reduce tightness).
- Strengthen and mobilizes the hips (improves hip mobility and pelvic tilt).
- Strengthens your abdominal muscles (improve lumbar support).
- Stretches your calve muscles (improve lumbar and pelvic posture, gait).

This exercise should be performed throughout the day, in the morning, afternoon and evening. Initially, it can be very challenging and uncomfortable. This movement is very safe without injuring your lumbar discs. (It is important to have consent from your family doctor before any exercise routine such as the Seated Hamstring Stretch.)
There is an Advanced Hamstring Stretch (and variants of it) which are taught in the Challenge Exercises. The advanced/challenge version adds even further strengthening and stretching required for recovery and protection.
Not only will it release tight hams even more but it will open up and add further hip mobility which you need.
Here it is: The Seated Hamstring Stretch
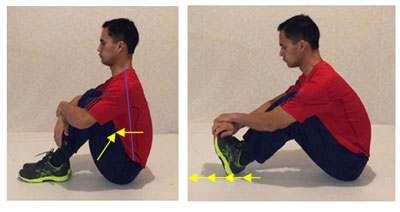
Step 1: Sit down on a soft carpet for comfort. Keep your back straight and bring your knees to your chest (Deep Squat Rest should be mastered before this exercise). Hold them with your arms and bring your belly area firmly against your thighs. Do NOT move to step 2 unless you are firmly and comfortably maintaining contact between your belly and thighs. Squeeze gently as though you are trying to hold a flat piece of paper in between.

Only your legs will move and NOT your back by using this technique.
Step 2: Hold your feet firmly with both hands. Make sure that you feel that your pelvis and lumbar spine are aligned and engaged with your thighs. Slowly extend your legs out but keep your belly against your thighs. This will preserve your lumbar and pelvic curve together. Maintain a grip on your feet.

You can achieve a real hamstring stretch without back pain this way.
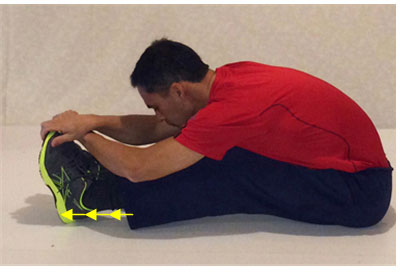
Step 3: Extend your legs slowly inch by inch and as far and as comfortably as you can. Hold for 1-2 minutes.
Step 4: Rest and repeat.
Note: Your legs should be the only part of your body that moves during this exercise; your spine should not move! Initially, this is a very difficult movement to perform correctly. In the initial stages, tightness and consequently shortened length of the muscles may prevent you from fully executing the movement. Over time this will improve.
Finally: Remember that you don’t have to rush this movement to the last image. It took me weeks to get there with my disc problems. Expect much more time than you would expect but it is worth it.
Full leg extension is NOT necessary to receive the benefits of this stretch. If you can extend as far as indicated in the above image, your hamstrings will be sufficiently lengthened to provide lower back relief.
The benefits that you will experience with this method are maintained in the eBook as you also perform the exercises just prior, and the more challenging ones afterwards. Go to the Table of Contents to see what it’s all about.
Don’t Just Stop at this Stretch Alone. There is more work to do.
A more advanced standing version in the Program eBook complements this movement and helps to dynamically stretch the hams further. It also protects the lumbar discs as compared to less safe, commonly taught, hamstring moves which can cause disc injury and pain.
“On day one of your plan, I did the first half of stage 1 and my lumbar spine became unlocked for the first time I can remember. For a few hours, I knew what it was like to be pain free. “
“I have been doing these for about a month now and even though my pain isn’t completely gone, it is a lot more manageable and I can already feel a decrease in the frequency of my pain as well as the symptoms.”
FULL, UNEDITED TESTIMONIALS AND REVIEWS TO HELP YOU DECIDE
